PC gaming has always had one huge advantage over consoles: modding. Because the platform is so open, dedicated communities can keep games alive for years by fixing bugs, improving performance, sharpening visuals, and even adding entirely new ways to play. Few places showcase that creativity better than Nexus Mods, where players can browse hundreds of thousands of user-made upgrades that help older favorites and modern releases feel fresh again.
Lately, performance-focused mods have become some of the most exciting tools in that ecosystem, especially as new rendering techniques like AI upscaling and frame generation reshape how games run. One standout example is DLSS Enabler, a mod by artur07305 that first became publicly available on January 15, 2024. Instead of adding quests, items, or maps, it targets the technical side of gaming—helping compatible titles run smoother and look better, even when the game itself (or your GPU) doesn’t officially support certain advanced features.
At a high level, DLSS Enabler is designed for DirectX 12 games that already support DLSS 2 (DLSS Super Resolution) or DLSS 3 (DLSS Frame Generation). If your graphics card supports DirectX 12 (feature level 12_0 or higher is strongly recommended), the mod can emulate and extend modern NVIDIA-style rendering features, aiming to deliver higher frame rates, smoother motion, and improved image quality without requiring top-tier new hardware. For PC players chasing better performance in demanding titles, it can be a powerful way to squeeze more life out of an existing setup.
What DLSS Enabler actually does is inject enhancements into supported games and simulate or replicate advanced features beyond what the game—or sometimes even the GPU—would normally allow. From version 4.0.0.2 onward, the mod’s feature set expanded significantly, giving players more control over fluidity and visual fidelity, especially in newer DirectX 12 releases.
One of the headline additions in recent experimental builds is Multi Frame Generation. Traditional frame generation generally aims for a basic 2X approach, but these newer DLSS Enabler previews can enable forms of Multi Frame Generation that go beyond that—supporting up to three generated frames in certain scenarios. In practice, that means 3X and even 4X modes may be possible for applicable games, which can make motion feel dramatically smoother on high refresh rate monitors, assuming your base FPS is already strong enough. It’s the kind of feature best suited for players who prioritize maximum smoothness and are willing to accept the trade-offs that can come with aggressive frame generation, such as potential artifacts and increased latency.
Multi Frame Generation support depends heavily on what a game already includes under the hood. The extended 3X/4X options require 4.0.0.2+ Tech Preview builds of the mod, and the game’s native implementation details matter a lot. According to the mod’s creator, newer versions can even override a title’s frame generation factor in some cases where Multi Frame Generation isn’t officially supported, as long as the game’s NVIDIA Streamline DLL files meet a specific baseline (at least version 2.7.2). The advantage is obvious: in GPU-bound scenes—where performance typically tanks—pushing higher “perceived” smoothness can make a heavy modern game feel far more fluid moment to moment.
Under the hood, this is made possible by modifying the open-source AMD FSR 3.1 Frame Generation code to generate more than one interpolated frame per rendered frame. It leverages NVIDIA’s open-source Streamline framework (the same general framework used for these kinds of features when implemented in games) and emulates proprietary NvAPI calls so the functionality can run even on non-NVIDIA GPUs. In other words, DLSS Enabler isn’t just toggling a hidden menu option—it’s actively bridging different technologies to create features that normally stay locked behind specific hardware or official releases.
In newer Tech Preview versions, there’s also work toward what the creator calls “Semi-Interpolated HUD.” The goal is to improve the look of certain UI elements—think shaded overlays like health bars, mini-maps, and other on-screen indicators—so they don’t look as rough or jittery when frame generation is active. UI behavior can be one of the biggest giveaways when interpolation is happening, so any improvement here can make the whole experience feel cleaner.
Another attention-grabbing feature is Screen-Space Ray Traced Global Illumination, or SSRTGI. This is essentially a performance-friendly approach to ray-tracing-style lighting for GPUs that don’t have dedicated ray tracing cores. Instead of true hardware-accelerated ray tracing, SSRTGI works in screen space, using the data already available through modern rendering techniques to enhance indirect lighting, contact shadows, and overall depth. DLSS Enabler’s documentation frames it as a “High-Performance SSRTGI” option meant to add richer lighting with minimal overhead, improving things like natural color bounce, atmosphere, and interior lighting detail versus purely rasterized lighting.
That said, the results aren’t universal. Because SSRTGI relies on screen-space techniques and injection hooks, its availability and impact can vary depending on the individual game’s rendering pipeline and how well it plays with the mod.
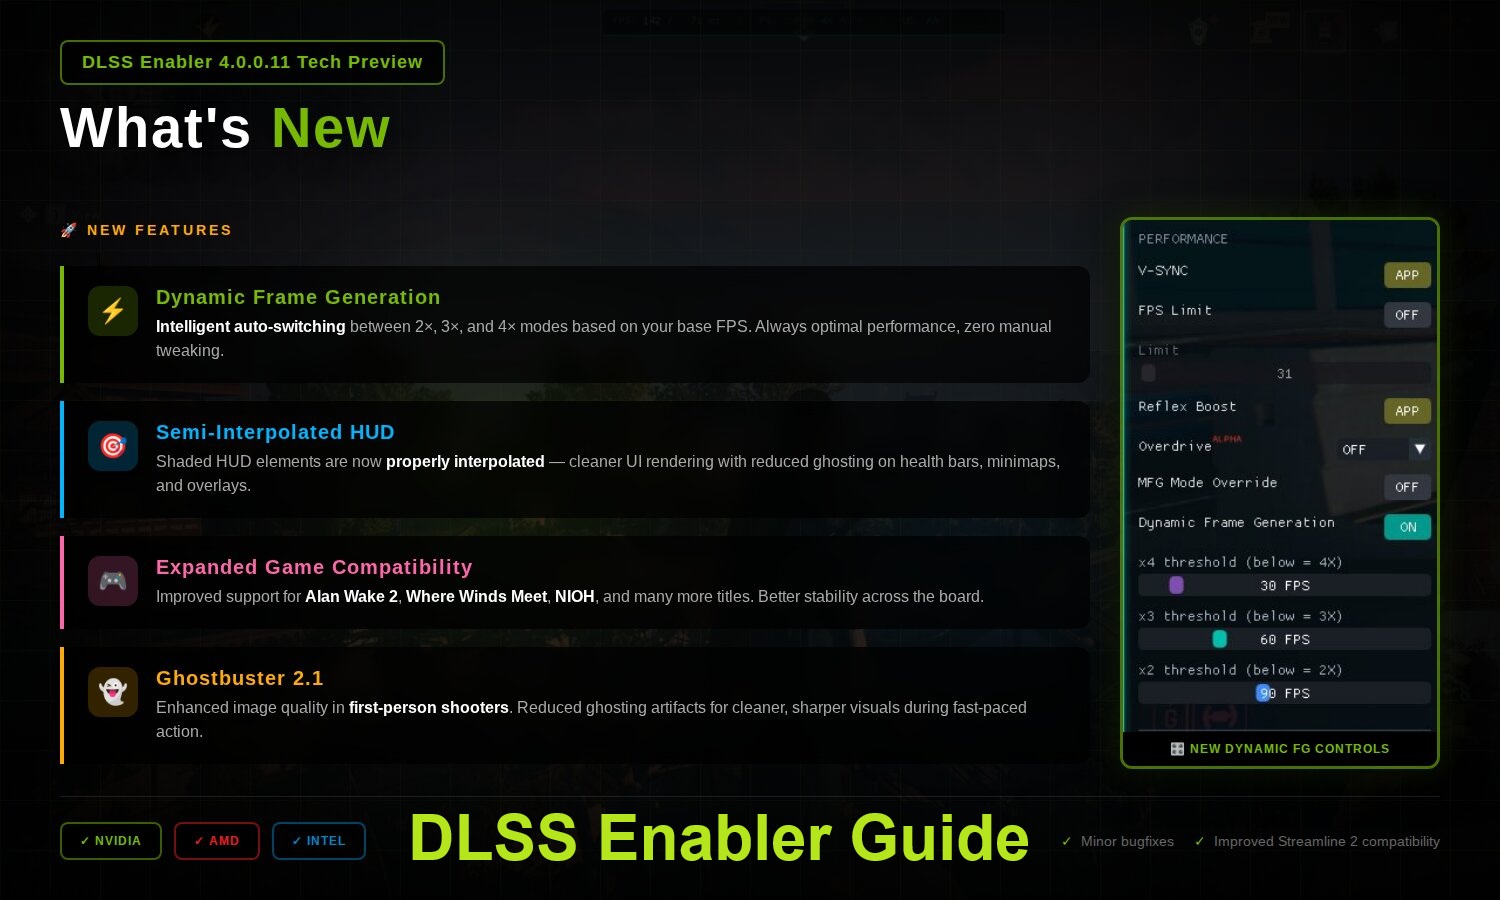
DLSS Enabler’s experimental branch also introduces Dynamic Frame Generation, a feature aimed at making frame generation smarter rather than stronger. Instead of locking you into a fixed frame generation factor at all times, dynamic frame generation adjusts the number of generated frames per rendered frame to reach a target frame rate. The idea is to avoid “under generation” (not generating enough frames when performance dips) and “over generation” (generating too much when it’s not needed), helping maintain a better balance between smoothness, responsiveness, and visual quality.
This concept mirrors what NVIDIA has been working toward with its own Dynamic Multi Frame Generation, though that official technology is expected to be limited to RTX 50 series “Blackwell” GPUs. DLSS Enabler, meanwhile, is attempting similar goals through a moddable, experimental approach.
Finally, DLSS Enabler also integrates with OptiScaler to offer what’s effectively universal upscaling customization. OptiScaler functions as a unified backend that can enable and tweak major temporal upscalers, replacing older approaches such as CyberFSR. In practical terms, this can let players access and fine-tune temporal reconstruction options like DLSS Super Resolution, AMD FSR upscaling, and Intel XeSS upscaling in a more unified way, even in situations where a game doesn’t natively support a preferred upscaler or where the GPU wouldn’t normally allow certain proprietary options. Combined with DLSS Enabler’s frame generation workflow, this opens the door to cleaner image quality at lower render resolutions while still chasing higher FPS.
For PC gamers who love to experiment—and who want better performance, smoother motion, and enhanced lighting without immediately upgrading hardware—DLSS Enabler has become one of the more talked-about technical mods in the DirectX 12 space. As with any mod that hooks into rendering pipelines, compatibility and results can vary by game, but the feature set shows just how far the PC modding community can push modern graphics technology beyond its usual boundaries.DLSS Enabler is a popular PC mod designed to tap into the data modern game engines already generate—things like motion vectors, depth and color buffers, and jitter offsets—and redirect those inputs to the temporal upscaling solution you want to use. The big appeal is flexibility: in some DirectX 12 games that only offer DLSS Super Resolution, the mod can make it possible to use an alternative upscaler instead, effectively expanding your graphics options without waiting for an official patch.
Because it works by hooking into how a game handles upscaling and related rendering features, installation and compatibility matter a lot. The process can be straightforward or fairly hands-on depending on which release you choose, and it’s important to follow the mod’s official instructions closely to avoid crashes, conflicts, or other issues.
How to install DLSS Enabler on a compatible game
Installing DLSS Enabler varies significantly between the stable releases and the newer Tech Preview builds. Stable versions rely on a guided installer, while the Tech Preview versions use a manual method that involves placing a specific DLL file into the game’s executable folder.
Stable releases (version 3.x and below)
For DLSS Enabler versions 3.02.000.0 and earlier, the installation is handled through a standard installer that functions like a typical Windows setup wizard.
You generally download the installer package from the mod’s main files section, run the setup application, and then point it to the folder of the DirectX 12 game you want to modify. The installer can also scan for supported games. Once you confirm the target directory and complete the prompts, it automatically places the required DLLs and configuration files in the correct locations.
After that, you launch the game normally, and the mod’s features should inject automatically.
These stable releases typically focus on making DLSS-related features available across a wide range of DirectX 12 titles, and they’re meant to be the easier, more user-friendly option.
Tech Preview builds (version 4.0.0.2 and newer, manual install)
The Tech Preview branch is where DLSS Enabler becomes more experimental and feature-rich. These versions add capabilities such as Multi Frame Generation (including 3x and 4x modes), Adaptive Frame Generation, SSRTGI (Screen-Space Ray Traced Global Illumination), and expanded upscaling controls through an OptiScaler-based backend. The tradeoff is that installation is manual and more prone to quirks depending on the game.
The mod creator labels these builds as experimental, and they’re best suited for users comfortable with troubleshooting, file management, and occasional instability.
The process typically looks like this:
1) Download the unified DLL for the 4.0.0.x build you want from the update files area of the mod page.
2) Rename the DLL to a filename the game will actually load. Depending on the title and how it resolves libraries, the documentation may recommend names such as version.dll, winmm.dll, dbghelp.dll, psapi.dll, or winhttp.dll. The “correct” choice varies by game.
3) Copy the renamed DLL into the same folder as the game’s main executable.
4) If you previously installed an older stable version of DLSS Enabler into that game folder, remove those older files first to prevent conflicts.
5) Launch the game. Once in-game, you can open the mod’s settings menu (commonly via the tilde key `) to configure upscaling, frame generation behavior, and other options.
A quick way to confirm whether the injection worked is to check the game’s executable directory for new .ini and .log files created by the mod.
Tips, precautions, and compatibility checks
Stability considerations: Tech Preview builds can be less stable because they bypass the installer and directly hook DLL behavior. Treat them like a test build, not a “set it and forget it” solution.
Game requirements: DLSS Enabler is intended for DirectX 12 games that already support DLSS 2/3 natively. It’s not a universal compatibility layer for any game.
Streamline requirement for Multi Frame Generation: The advanced frame generation capabilities depend on the NVIDIA Streamline framework, and Multi Frame Generation functionality may require Streamline version 2.7.2 or newer (or whatever minimum version the mod build specifies).
Multiplayer and anti-cheat warning: Avoid using DLL-injection-style mods in multiplayer games. Anti-cheat tools may flag the behavior, and it can potentially lead to bans.
Real-world testing example: Cyberpunk 2077
To show how DLSS Enabler’s newer features behave in a demanding scenario, the mod’s functionality was evaluated in Cyberpunk 2077, a well-known DirectX 12 stress test with built-in upscaling and frame generation features. That makes it a strong candidate for examining additions like SSRTGI, Multi Frame Generation at higher multipliers (3x/4x), and Dynamic/Adaptive Frame Generation—especially in terms of image quality, performance, and overall smoothness during gameplay.
The test system used the following specifications:
CPU: Intel Core i7-14700K
RAM: 32 GB DDR5-7000 CL34
Storage: 2 TB PCIe 4.0 NVMe SSD
GPU: NVIDIA GeForce RTX 4090
Operating system: Windows 11 25H2
All firmware, drivers, BIOS, and OS updates were applied prior to testing.
Testing was done at 2560×1440 resolution on a 240 Hz display with VSync enabled for clean, tear-free capture. The game used the High preset, DLSS Super Resolution set to Quality mode (Preset K), and ray tracing enabled for global illumination, shadows, and reflections alongside DLSS Ray Reconstruction for improved ray-tracing denoising. For SSRTGI comparisons specifically, the visual output needs to be evaluated with ray tracing both enabled and disabled to properly understand what SSRTGI is adding.
The build used for this setup was a work-in-progress Tech Preview version, 4.0.0.11. Installation followed the manual approach: the extracted version.dll was placed into the Cyberpunk 2077 bin/x64 directory (the same location as the game’s executable).
To improve compatibility—particularly for Multi Frame Generation and Dynamic Frame Generation—an additional step was taken: updating the game’s NVIDIA Streamline DLL files to a newer stable release. As with any manual DLL replacement, backing up the original Streamline files is a smart precaution in case you need to revert to the unmodified state or troubleshoot unexpected behavior.
The takeaway
DLSS Enabler has become a go-to option for PC players who want more control over upscaling and frame generation features in DirectX 12 games, especially when official in-game options are limited. If you want the simplest experience, stable releases with the guided installer are the safer route. If you’re aiming to experiment with newer features like Multi Frame Generation, Adaptive Frame Generation, and SSRTGI, the Tech Preview builds offer more cutting-edge tools—just be prepared for manual setup and occasional trial-and-error per game.If you’re trying to squeeze a smoother, more responsive Cyberpunk 2077 experience out of your current GPU, DLSS Enabler is one of the more interesting mods to experiment with. It adds multiple performance and visual options that can change how the game feels moment to moment, including advanced frame generation modes and optional lighting enhancements. But before diving in, it’s important to install it correctly and understand what you’re actually enabling, especially since some features can look great in motion while still introducing visual artifacts in certain scenes.
First, a quick but important warning: do not copy any DLL files from the “bindevelopment” folder. Those builds include extra debugging code intended for internal testing by engineers, developers, and modders, and they can cause problems in a normal gaming setup. Stick to the correct release files meant for regular gameplay.
Once the mod files are in place, launch Cyberpunk 2077 to confirm everything is working. A small OptiScaler splash message appearing briefly in the bottom-left corner of the screen is usually the first sign that the mod loaded successfully.
If you don’t want that splash message to show up, you can disable it through the configuration file. After the first launch, an Optiscaler.ini file should appear in the game’s executable directory (Cyberpunk 2077binx64). Look for the “DisableSplash” setting there and adjust it based on your preference.
After the game is running, you can open the DLSS Enabler in-game menu by pressing the tilde (`) key. The menu is structured into four core sections, each focused on a different part of the experience.
The Graphics section is where you’ll find Screen-Space Ray Traced Global Illumination (SSRTGI). It includes quality and performance profiles so you can choose between stronger lighting effects or better framerate. There’s also a Ghostbuster option marked as a work in progress, designed to reduce ghosting that can happen when extra interpolated frames are injected between real rendered frames.
The Performance section is packed with tools for tuning responsiveness and smoothness. You can toggle VSync, set a framerate limit, configure NVIDIA Reflex Low Latency behavior, and enable an alpha “Overdrive” feature. Overdrive applies optimizations from the mod author that can bias frame interpolation toward quality, performance, or lower latency. This is also where you can enable Dynamic Frame Generation and override Multi Frame Generation multipliers, which can be especially useful in games that support DLSS Frame Generation but don’t officially expose Multi Frame Generation options.
The Interface section is for on-screen stats and status readouts such as FPS, PC latency, the active frame generation multiplier, and upscaling mode. If enabled, you’ll also see a status bar at the top-center of the screen that provides a quick overview of what the mod is doing in real time.
The Debug section is mainly for troubleshooting and mod development testing. Most players can ignore it unless they’re dealing with stability problems or want to help diagnose behavior for updates.
One of the most attention-grabbing things DLSS Enabler can do is expose a “DLSS Multi Frame Generation” option in games even when your GPU wouldn’t normally support it. In other words, the game may display Multi Frame Generation controls as if the hardware supports it. However, it’s crucial to understand what’s happening here: this is not native DLSS Multi Frame Generation. It is DLSS Enabler’s own Multi Frame Generation approach, built on a modified version of AMD FSR Frame Generation 3.1, presented through a compatibility layer.
SSRTGI is the first major feature worth testing if you’re chasing improved lighting. In Cyberpunk 2077, it can add more convincing indirect lighting, including bounce light that the standard non-ray-traced lighting solution doesn’t reproduce in the same way. The trade-off is performance cost. At higher presets such as Ultra, SSRTGI can be extremely demanding—roughly in the territory of the game’s most intense ray-traced global illumination options. If you’re on a weaker GPU, especially one without strong hardware ray tracing performance, Medium is often a smarter target because it can enhance the look of indirect lighting without demolishing your framerate as severely.
The next headline feature is Multi Frame Generation. When tested across multiple modes, the mod can noticeably improve perceived smoothness by creating additional frames between rendered ones. In practice, the 2X mode tends to look the cleanest among the mod’s options. Higher multipliers like 3X and 4X can push motion smoothness further, but they may also introduce more visible instability. In Cyberpunk 2077, issues like car shadow flickering and garbled shadow behavior can show up more clearly at higher multipliers. Even so, it’s impressive that the mod can deliver extra interpolated frames with generally decent frame pacing and playable latency, particularly given claims that high-quality multi-frame pacing needs specialized hardware logic.
Another area where the mod deserves credit is UI handling. HUD elements like the mini-map, objectives, and other overlays are notoriously difficult for frame generation solutions to treat cleanly, yet DLSS Enabler’s approach can keep these elements surprisingly stable compared to what you might expect from a non-native solution.
Dynamic Frame Generation, however, may not behave as intended in Cyberpunk 2077 right now. In testing, it reportedly defaulted to 4X Multi Frame Generation regardless of the FPS thresholds that were set. If you run into the same issue, it may be a bug in the current mod version or a limitation in how the feature currently interprets its targets in this game. A more streamlined approach—setting a single framerate goal and generating only what’s needed to maintain it—could be easier to manage and more predictable, but that would require changes from the mod’s developer.
DLSS Enabler also includes OptiScaler integration, which opens up even more advanced tuning. You can access the OptiScaler menu while in-game by pressing the INSERT (INS) key. From there, you can adjust frame generation algorithm behavior, Reflex Low Latency settings, and other OptiScaler-specific options such as temporal upscaling tweaks, sharpening, and anisotropic filtering enhancements.
If you run into problems, start with the basics. The OptiScaler splash message in the bottom-left is usually the first confirmation the mod initialized. Next, press the tilde (`) key to see if the DLSS Enabler menu appears. If it doesn’t, the mod may not have initialized correctly, or the game might not be detecting a compatible DLSS 2/3 rendering pipeline in the current configuration. In that case, checking the dlss-enabler.log file generated after launch is one of the fastest ways to pinpoint what failed during startup.
Done right, DLSS Enabler can be a powerful way to explore smoother gameplay, alternative frame generation behavior, and enhanced lighting in Cyberpunk 2077. Just keep expectations realistic: some features are still evolving, some modes can introduce visible artifacts, and careful tuning is often the difference between “buttery smooth” and “visually distracting.”One of the fastest ways to confirm that DLSS Enabler is working properly is to check the log file the moment you launch your game. You’ll typically find it in the same folder as the game’s executable. This log is your “truth source” for what the mod actually did at startup: whether it successfully attached to the game process, detected your GPU, and loaded the key modules that make everything function. When it’s working as intended, you should see clear entries showing core components loading (including FrameGeneration, OptiScaler, and NvAPI emulation) along with notes about which features are being evaluated. If those entries are missing, that usually explains why options never show up in the game’s settings.
If you’re trying to use Multi Frame Generation or Dynamic Frame Generation, updating the game’s NVIDIA Streamline DLLs is also crucial. These newer DLLs don’t just enable the extra frame generation modes—they can also eliminate bugs tied to older Streamline versions that may interfere with how the mod hooks into the game. For many users, modernizing Streamline is the difference between frame generation appearing but not functioning and everything working correctly.
Still not seeing frame generation or SSRTGI even though the menu shows the options? The next thing to verify is whether the game actually supports DLSS2 or DLSS3 at a native level. DLSS Enabler depends heavily on the game’s rendering pipeline and whether the mod can intercept DLSS hooks early enough during startup. It’s also important to make sure you’re using the correct Tech Preview build of the mod—those preview builds are often the ones that include experimental functions like SSRTGI and advanced frame generation modes. In other words, the menu appearing doesn’t always guarantee the feature can be activated in that specific title.
On the troubleshooting side, several common problems show up repeatedly in community reports. Stuttering or instability after alt-tabbing, or odd visual glitches while frame generation is enabled, are frequent complaints. In many cases, temporarily disabling frame generation can immediately settle performance down, and simply restarting the game can restore the rendering pipeline to a clean state. If you’re dealing with missing menu options or crashes at launch, the cause is often more basic: incorrect DLL naming, incorrect placement, or leftover files from older versions. Removing older mod files and ensuring the Tech Preview DLL is named exactly as documented (for example, version.dll or dbghelp.dll, depending on the setup) can resolve a surprising number of “it won’t load” situations.
When none of the above solves it, the best fallback is a clean reinstall of the mod with no leftovers. From there, confirm your GPU drivers are current, verify the game’s files to rule out corruption, and make sure no other mods are conflicting with the same rendering or upscaling hooks. Those steps won’t fix every compatibility limitation, but they do eliminate the most common causes of failure before you move into deeper debugging.
In the bigger picture, DLSS Enabler stands out as one of the most ambitious community projects aimed at bringing modern upscaling and frame generation to more PC gamers. By combining OptiScaler, NvAPI emulation, and expanded frame generation features into a single package, it can help deliver smoother gameplay and improved image quality in demanding games—even for users whose hardware might not officially support every new feature out of the box. Additions like Multi Frame Generation, Dynamic Frame Generation, and Screen-Space Ray Traced Global Illumination highlight just how far modding tools can push today’s rendering pipelines, widening access to advanced visual technologies on both NVIDIA and non-NVIDIA GPUs.
At the same time, it’s still a technical and experimental solution. Your results will vary depending on the game, the GPU, the driver, and how the title implements DLSS internally. If you’re willing to test, tweak, and troubleshoot, DLSS Enabler can be a valuable tool for boosting smoothness and visual fidelity—especially in single-player games where pushing performance and image quality can make a big difference.